Save your Project
Whilst working on a project, it is good practice to save your project from time to time . You should also save it before you close the project or close down Form Studio. However, if you attempt to open a new project or close the currently open project without first saving any changes, you will be prompted to save the current project.
To save the current project, do one of the following:
- Choose File ➝ Save to save your project to the current location.
- Choose File ➝ Save As to save your project to a different folder or to create a copy of the project which will retain the original features (see the Save As drop-down, below, for additional information on the benefits of using this feature to create different versions of your project).
- Click on the Save button,
 , in the top left-hand corner of the Form Studio window. This is the same as choosing File ➝ Save.
 - Press Ctrl+S. If the project hasn't previously been saved this will be the same as choosing File ➝ Save As, otherwise it will be equivalent to choosing File ➝ Save.
Project names can only contain A-Z, a-z, 0-9, and '_', and cannot contain spaces.
You can change the default location for saving projects in the Form Studio Settings.
- Form Studio maintains a temporary copy of your project, whilst you work. When you load the Studio, it checks to see if there are any temporary copies in this folder and, if so, offers you the opportunity to recover them. The temporary copies are deleted after a successful save. By default these temporary files are saved under C:\Users\<username>\AppData\Local\Temp\Forms Studio\Recovered Projects but you can change this folder if you want to within the Form Studio Settings.
Using the enhanced Save As option, it is possible to set up different versions of the same Digitise Forms project based on a standard form template, and for any fields, labels, and other items which are contained within that template to be retained when copies are created. An example of this might be an NHS form which has been configured to be used within a department or across a specific healthcare site, and which includes standard components such as a header, a logo, and a set of common, mapped elements. This base project could then be cloned, and individual copies could then be developed and enhanced for different use cases - all of which would incorporate the base features.
Before using Save As, the project should be saved, initially, using the required project base name. Once the base project has been created, this can then be saved into another version by choosing File ➝ Save As. When the copy of the base project has been saved, the copied version will retain all of the elements, mappings, labels, and other properties as described above, but credentials will need re-entering for any datasources which have been carried over from the original version.
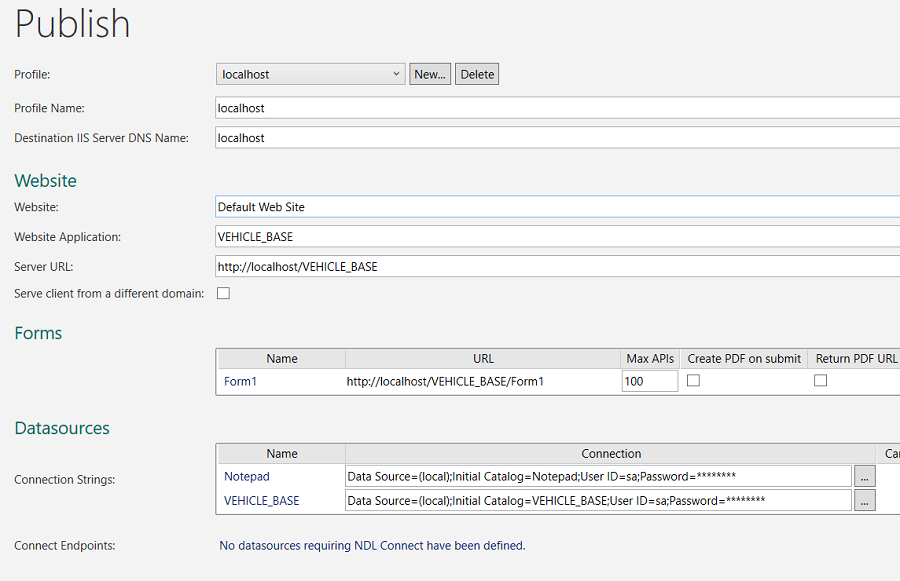
In the below example, a Digitise Forms project named VEHICLE_BASE has been created and the Publishing Profile for the project has been opened. The connection strings for the two datasources which the project contains can be seen beneath the Datasources heading.

This base template can now be copied and any items which the form contains will be retained and won't need re-configuring (apart from the connection credentials).
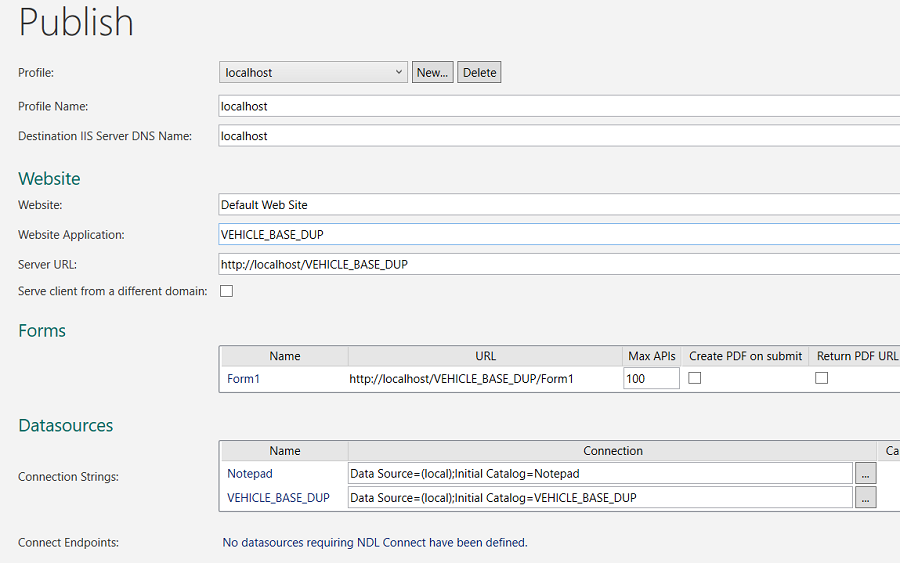
In the following image, the VEHICLE_BASE project has been copied and the cloned version has been saved as VEHICLE_BASE_DUP.

For Website Application, Server URL, Forms and the named datasource from form item (the second Connection String item beneath the Datasources heading), these have automatically been changed to incorporate the copied project name (VEHICLE_BASE_DUP). You will notice, however, that the separate Connection Strings no longer have user credentials assigned to them (i.e., no username and password information appears at the end of each of the connection listings). The correct credentials will need entering, which you can do by clicking the Browse button, 
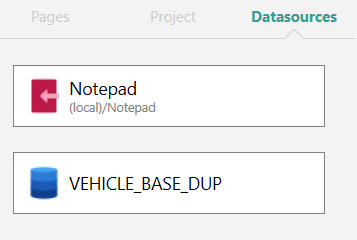
- When a project has been cloned, any datasources which have been carried over from the base template will automatically be renamed within the Publishing Profile as mentioned above. They will also be renamed beneath the project's Datasources tab. In the following image, the form datasource is now labelled as VEHICLE_BASE_DUP:

Once copied versions of the form have been developed, users can easily switch between the different iterations by closing and then opening the named Digitise Forms projects without the different versions impacting upon one another. This could be useful where comparisons between different versions of forms need to be made, or where a form's progress needs to be tracked against the original.
When using a base project as the template for future projects, and where versioning of a form is initiated by copying the base project and saving it into as many iterations as may be required, it is important to keep track of the contents of each, and to make sure that the correct version is being copied and deployed, or the correct version is opened where different versions may be saved within the same project or file location. This is of particular relevance where different versions of a form are being used at the same time within the same department or organisation.
Taking a base template which is assumed to contain all of the required items (but which has missing components) and copying and deploying it several times could lead to lots of forms needing to be re-configured in order to include any missing elements. It is therefore important to check the base, original copy of a project to make sure that it contains all of the required elements before cloning, versioning, and developing of additional copies begins.
If you make any changes to the custom Scripts within your projects, using either the built-in Script Editor or an external editor, you MUST save your project before you close it to keep the changes. If you want to lose your changes, you can close the project without saving it.